

There are many components to a great golf swing that have to come together in harmony in order to hit a proper golf shot. Players – professionals even, spend their entire lives refining and improving their swings, many never feeling like they’ve ever perfected it. While the perfect swing is an elusive one, we can work to build up our comfort level with our own swing and make it the best to our ability.
I believe the golf swing is about acquiring learned skills and knowledge by using the body in order to create natural motions in the proper sequence. That natural feel to your swing is developed by years or practice and training. The goal is for you to be at the level of comfort to be able to feel the swing from setup, to backswing, top of the swing, downswing and follow-through.
Leverage Your Athletic Ability: If you play other sports (or even know how to throw a ball or a cornhole bag), you already have the capability to hone your golf swing to the point where you no longer have to think about it or constantly break it down step by step.
Compare this to when someone throws a ball. They go through the phases of the motion such as weight transfer, arm swing, release, follow-through. But no one ever dissects this simple action of throwing an object but when you put a golf club in someone’s hand, your instincts go out the window.
As a certified Class A PGA Golf Instructor, my goal is to prepare you to the point where you have a naturally-occuring swing that you don’t have to over-think and allow your instincts to take control. Then, any refinements to your swing after that are much more manageable.
I believe the more you understand how the golf swing works, you can relate it to things you do on a daily basis. You will open your mind up and that will lead to changes, better results, and more confidence. They say golf is more mental anyways right? So let’s break down the components of a golf swing.
Proper Golf Setup Stance
A proper golf stance is the foundation of your swing. It sets the tone for your swing before you begin your motion. There are 5 components of a proper Golf Setup.
1. Stance
Your stance is the base for maintaining balance through your shot which will help your body rotate, create a consistent tempo and generate power.
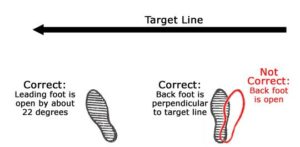
The feet should be opened up a bit which means the toes are pointed outwards a bit. Feet pointing straight ahead can limit your lower body turn and can lose your balance. This is a personal preference however all depending if you do not get weight transferred properly.
Legs should be a bit bent with most of your weight in the middle or towards the balls of your feet.
Weight should be distributed mostly 50/50 among both feet. Some players like to jump-start momentum so you can favor a bit more weight to the side closest to the target at setup and then push off into your back leg.
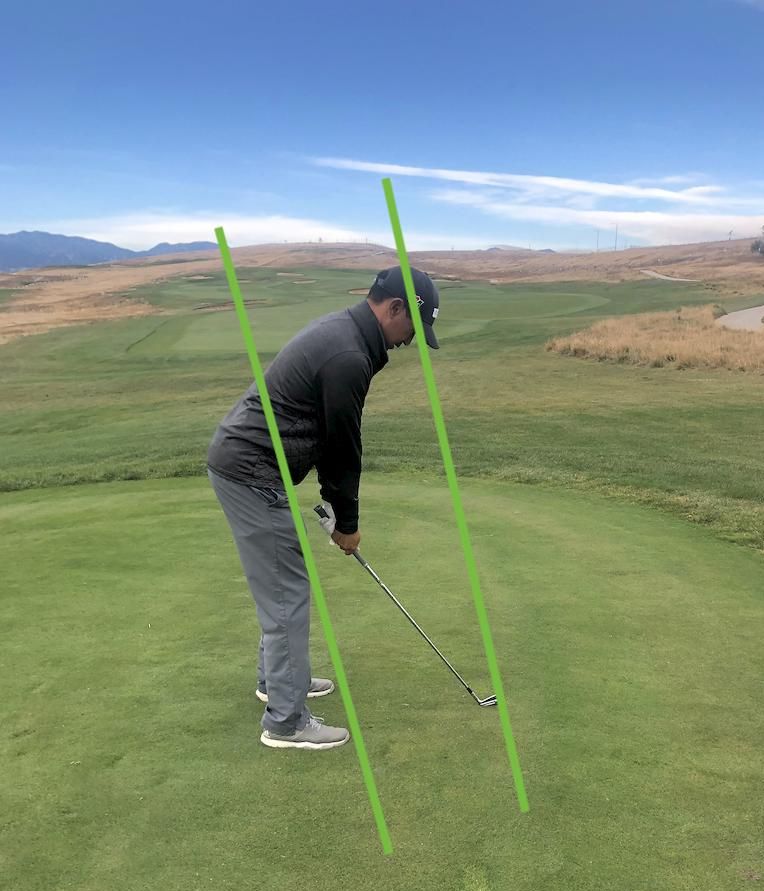
2. Alignment
The alignment of where your shoulders are aiming versus where your feet are aimed promote the direction of your ball flight. Shoulders should be aligned with your hips and feet line (unless you intend to curve the ball – I’ll cover that in a different post).
Pro Tip: Have someone stand behind you to see if your shoulders and lower body are lined up in the same direction (or have someone take a picture for you). If your shoulders and hips are not pointing in the same direction it may lead to unintended spin on the ball.
3. Ball Position
The position of your ball in relation to your feet is critical in determining how the clubface makes contact with the ball, at what angle and at what speed. A ball position set more towards the lead foot – typically placed for woods, will be hit on the upswing which allows for more lift and length. A ball position set in the middle of your stance is great for iron shots where you are looking for more accuracy rather than lift and length. A ball should never be positioned behind the center position.
Here is a standard guide on ball placement per club type:
- Driver – Tee up ball off the inside of your left heel
- Fairway Woods / Hybrids – Place ball 1/2 inch right of Driver position
- Longer Irons – (3-5/6) Place ball 1/2 inch right of Fairway Woods / Hybrid position
- Mid/Short/Wedges – Center of your setup stance, between your legs

4. Posture
I believe posture is just as important as the grip. How you put your body stance when you are about to take a swing will promote and determine your body turn and club/swing plane.
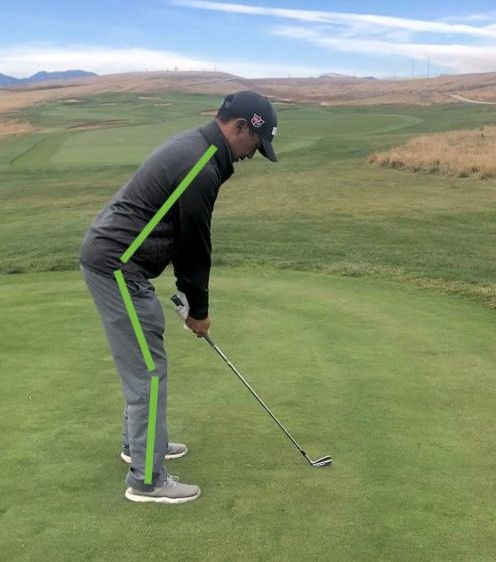
A proper posture consists of only 4 lines. 1) Ankles, 2) Thighs 3) Torso 4) Arms
- Your ankles should be positioned with weight on the balls of the feet.
- Your thighs should be barely bent and flexed.
- Your torso should be slightly arched, leaning forward.
- Your arms should be hanging down from your shoulders nice relaxed.
5. Clubface
There are 3 common clubface positions. 1) Closed 2) Open 3) Square.
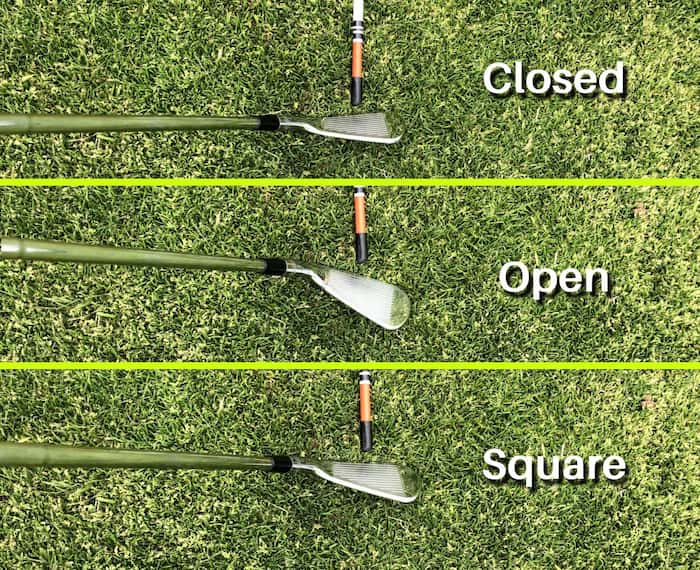
Golfers want and believe their clubface is in the square position, but commonly set up their clubface in the closed position without realizing it. I usually show my students by putting a tee against their clubface at setup and showing them where the tee is pointing.
Many players can play somewhat consistent with different clubface setups all depending on their swing but let’s understand how their clubface can affect the swing, good and bad. (See Identify your Clubface at Setup)
Closed Clubface
A closed clubface at setup is not ideal but some can make it work. A closed clubface at setup has a tendency to close further in the backswing. You’ll likely lose distance and accuracy due to your body needing to adjust to get the clubface back to square at impact.
This usually means that your body is not in a natural state during the swing so you are putting lots of unwanted pressure on your back and spine. Here are some reasons why a closed clubface can hurt you.
- Your club will be positioned in your grip that will be harder to release the club on the way back and then changes how you are to release on the way down.
- Not able to get a smoother rotation and transfer weight to your right side naturally
- Why close the face in the backswing if you are going to close it on the way down?
- A closed clubface at setup can be caused by an improper grip or the club positioned wrong in the grip. A strong grip can also be the cause.
- When you follow through right after impact, the clubface will close because of how we turn our body. Why not have a slightly open face at impact because the post-impact path will divert it closed.
Open Clubface
An open clubface at setup is also not ideal but will help you release the club with better contact. However, you will lose accuracy as it will promote you to over-rotate your wrists and can mis-align your setup.
- Twisting your wrists adds yet another variable to your swing which makes it very difficult to maintain any sort of consistency.
- If your face is open, your alignment setup including the shaft of the club will most likely not be square to your target.
Square Clubface
A Square Clubface is the one you should use the most as it can lead to proper fundamentals in your golf swing. This position has the clubface pointing in line with your shoulders and hips, allowing for more straight shots and minimizing any unintended spin.
- Can promote a more sound takeaway using your shoulders and upper torso
- Will slowly open your clubface
- Allow you to release the club in your hands to create a better transition, faster clubhead speed and create lag for the downswing
- Promote a full release through impact after clearing your hips
Now that we’ve covered the 5 components of a proper Golf Setup and Stance, let’s move onto gripping a golf club.
How to Grip a Golf Club
How you grip a golf club is the lifeline of your golf swing. If held properly, it can set you up for a successful swing. If held incorrectly, you will have a difficult time making it up with the rest of your swing. I go into more details about the various ways to grip a golf here on my How To Grip a Golf Club post, but below are steps you should take for the Conventional Grip, which is the most commonly used grip.
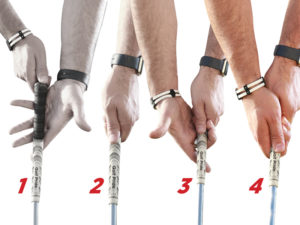
Left hand grip (for a right hand golfer)…
- Grip club out higher in front of you
- Lay the grip onto the middle of the fingers with an open hand with a slight angle closer to the index finger tip to the base of pinky
- Let fingertips curl around grip
- Let rest of hand just lay over on top of grip
- You should feel the grip secure in you palm
- Left thumb should extend down middle-right center front of grip
Right hand grip (for a right handed golfer)…
- Lay the grip onto the middle of the fingers with an open hand
- Connect the hands with right pinky either interlock or overlap
- Grip from underneath feeling it with all of your fingers extended down the grip
- keep the top of club (usually a name/mark to identify top-center) in-between thumb and index finger “V”
- we want similar pressure on these two fingers on both sides of grip in similar opposite location
Backswing

Having a fundamentally-sound golf backswing sets the stage for a properly coordinated downswing. The purpose of the backswing is to shift your weight to the trail side of your body – similar to shifting your body to your back foot when throwing a baseball or football.
There are 4 critical parts of the backswing.
- Takeaway – Just learning how to take the club back is vital. This is just the part until your hands get past your right leg.
- Loosen your grip. This will put your shoulders including upper torso in control in takeaway. Many golfers have a tendency to grip the club too tightly upon initial takeaway, which results in an early wrist hinge and preventing a better turn of the body.
- Use your shoulders. Your shoulders are the biggest levers of your body. Use them to guide the rest of your body (see more in the Body Rotation section).
- Keep your left arm straight as you rotate your upper torso and prevent early wrist hinge.
- Should be starting the lower body rotation that follows the upper body movement. Weight will start to transfer into right leg
- Your right knee should maintain its flex (please read the Golf Stance section above on how to position your knee)
- Your left heel should remain planted. It should only slightly leave the ground
- Your back knee should maintain its flex (please read the Golf Stance section above on how to position your knee)
- Stay on the target line. Be sure your clubface stays on your target line at takeaway, past your back foot.
- Upper Body Rotation. A good body rotation should be led by your shoulders, creating an arc around the center of your body.
- Rotate your shoulders and toro. I sound like a broken record because this is critical. Keep your shoulders loose so you don’t restrict your upper body to rotate also. This will allow for an easier weight transfer.
- Keep your hands, arms and clubs out more in front of your body, not to the side of behind you.
- Rotate your head. A slight rotation of your head away from the ball during the takeaway will help you feel more comfortable and can give you the assurance of rotating. (Dustin Johnson does this well)
- Feel the Weight. More weight should be shifting to your back leg during your upper body rotation. Still keep that right leg flex!
- Keep Arms out of it. Your lead arm should still remain fairly straight through the backswing until you reach hip level.
- The clubface will start opening naturally caused by the rotation of the shoulders and torso.
- Club Release and Positions. Releasing your club is when you allow the weight of the clubhead to build momentum in your swing. Your wrists and grip pressure must be loose enough to allow this to happen. The clubhead will start creating more speed and travel a bit further as the body rotation is coming to an end. The clubface should still be in the open position. This part is critical in setting up your transition to feel more comfortable. (See Drills to Release the Club)
- Lower Body Rotation. Before we can transition to the downswing, we must first address what is happening with our lower body during the backswing.
- Left Leg. The knee of your forward leg should slightly bend towards the golf ball right before the end of your backswing. You will feel a bit more pressure into the front part of your left foot. You should expose space behind your left knee if you are to see your backswing from the side view.
- Tuck Your Trail Hip. We don’t want to over-rotate our lower body so we want to keep our back right hip from opening up which will lead to poor angles with your body. In order not to over-rotate, keep that right leg flex bent and you will feel that your right hip is tucked and secure. Consider it like a backstop of your swing.
Visit my Golf Backswing post to read more details and for helpful examples and references.
Top of the Swing
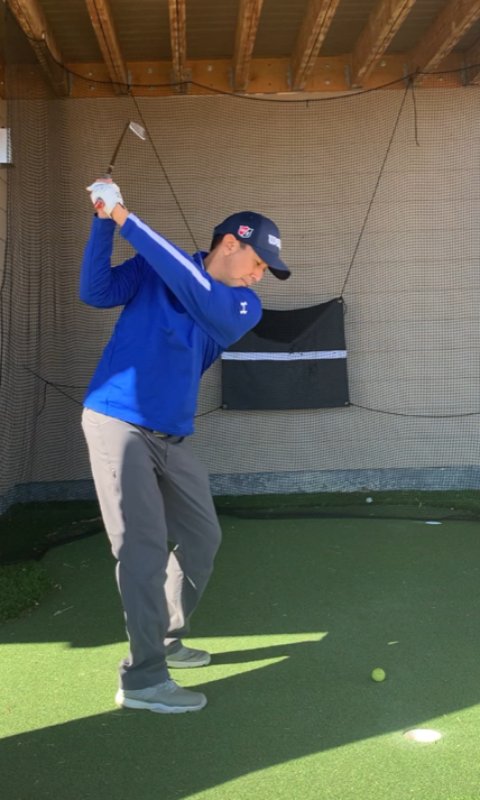
While the top of the golf swing is a small moment in time, it will dictate your tempo and create the proper sequence for your downswing. The top of the swing can provide greater control of your swinging motion and is a key area in what separates the good vs the great players, on a more consistent basis. Here are a few key areas of note to focus on at the top of your swing.
- Keep Club Stable. You want to keep your grip strength at a moderate level. Too tight and you can’t get a proper release. Too loose and your hands may dip from the flopping weight of the club.
- Be Patient. Rushing the transition at the top of the swing will release your hands and arms ahead of your lower body which will put you out of sync and cast the club. Be patient and let your golf club finish its rotation.
- Find a Trigger Mechanism. Your trigger is a “checkpoint” that signals when you have completed one movement and are ready to start another. This signal is commonly felt when tension is created in your trail glute/hip as your upper body rotates further around the lower body.
- Tip: Try crossing your arms over your chest without a golf club and get in your setup and stance. Rotate like your backswing and see if you can feel tension in your trail side glute.
- Lower Body starts Downswing. Here are some tips that you can use to start your transition with your lower body.
- If you put that pressure onto the front part of your left/lead foot, you will use that to start the downswing motion.
- You want to feel that you will be jump-starting your downswing right before you finish your backswing. The flex in your clubs will delay your clubhead as your body starts going forward. This is what you want to create that lag so more clubhead speed is produced.
Downswing

The golf downswing is the most reactionary component of your golf swing. It should have already been set up from your takeaway, backswing and top of swing – which you should now understand better. But let’s dive in to understand the downswing and how you can optimize your golf swing.
- Use your body more than your hands. Loosening your hands with a moderately-tight grip will force you to lead with your body – which is exactly what you need to drive power and speed with your swing.
- Use the Ground. Pushing into the ground with your forward leg can help jumpstart the body to clear and get all of your weight transferred to your finish.
- Feel weight into the left leg and foot. It is difficult to control and feel what your hips are doing so focus on what beneath them. Your left foot can be a focus point on how you get to your left side. If you have a strong left leg flex, you will feel weight pushing down on those toes and ball of your feet as your leg flexes into the ground. As you start your downswing, the weight is then transferred around the outside of the left foot finishing on the outside of the left heel.
- Shallow club plane. This means that your hands and club start down lower than when it came up. This is caused by your lower body leading your swing with the club lagging behind. Everyone wants an “in-to out” swing so don’t force it just be patient and allow the body to do it for you.
Follow Through

The follow through of a golf swing is much more important than you think. Everyone is so focused on where the ball goes that not many could tell you what they looked like when or if they even finished their swing. I’ve asked many of my students this and they say that is the first time anyone has ever brought it up. Here are reasons why it is important to hold the follow through in the same manner every swing.
- Watch your Ball until it stops – You need to see where the golf ball goes anyways so let’s do it facing the target with all of your weight to your forward leg. I usually tell my students to hold the finish position until your ball stops. This means starting this on the driving range and using it on the course. Also, many golfers lose their golf balls because they never pinpoint the location of where the ball rests (sometimes out of frustration, but be patient and responsible so you don’t delay your foursome or those behind you from constantly looking for your ball).
- Look like a Player! – You will look like you hit every shot the same so let’s look like that at the end of your swing. Be that Player!
- Builds Good Tempo – If you train your yourself to get to the same position every golf swing, you will become more patient on the downswing and feel more comfortable getting to that finish routinely.
- Prevents being “Too Quick” – Golfers know that being too quick is a bad thing. They are quick because they are trying to hit the golf ball and hit it hard. If you get to your finish properly and hold it, your end goal is to get there without even trying to hit the ball.
- Gives you Perfect Balance – Have you ever seen a Professional Golfer lose his balance on a flat lie? Pay attention to yours and you’ll know that in order to feel balanced at the end of the swing, you’ll have to feel balanced during the swing.
- Promotes Weight Transfer – If you ever notice that you did not finish your swing balanced, that usually means you were probably on your toes at impact. This means your weight never cleared to the lead leg before impact.