The golf stance is more important than you think. There are so many ways to set up your posture in preparation of hitting a golf ball. The stance can help promote great consistent swings or prevent you from performing that. This is part of the setup before you even swing so understanding and being more comfortable with your golf stance will allow it to be more routine for you.
Your golf stance is the base of keeping balance which will help your body rotate and create all that power and to start the proper sequence. Once your swing feels comfortable you can take advantage of a good stance to create a consistent tempo and swing.
Let’s start with the base of your golf stance…
Lower Body
- Your feet and legs should be shoulders width apart for most irons (6-PW). The width gets wider with longer clubs and narrower with wedges and shots that require less than a full swing.
- Your feet should be open up a bit which means the toes are pointed outwards a bit (away from the middle). Feet pointing straight ahead will limit your lower body turn and can cause you to lose your balance.
- (If you want to feel the difference of how important this is, turn your feet/toes inwards towards each other and take a swing. It will be impossible to feel balanced. Then turn your feet outwards and take a swing. It will feel more smoother with your hips turning with ease and getting your weight to your forward leg/feet.
- Legs should be a bit bent with most of your weight into the balls of your feet
- Weight should be distributed mostly 50/50 among both feet. Some golfers like to jump-start momentum to their back side so they can favor a bit more weight to the side closest to the target at setup and then push off into their back leg.
Posture
Trying to put your body in a certain position when you can’t see what it looks like is very difficult and surprising what you think you are doing and what you actually look like. I have shown my students plentiful of what their posture looks like to what they actually believe. I tell them to exaggerate sometimes and see where that takes them but one day I just came up with a posture reminder to help my students always remember what their posture should resemble.
PacMan Posture
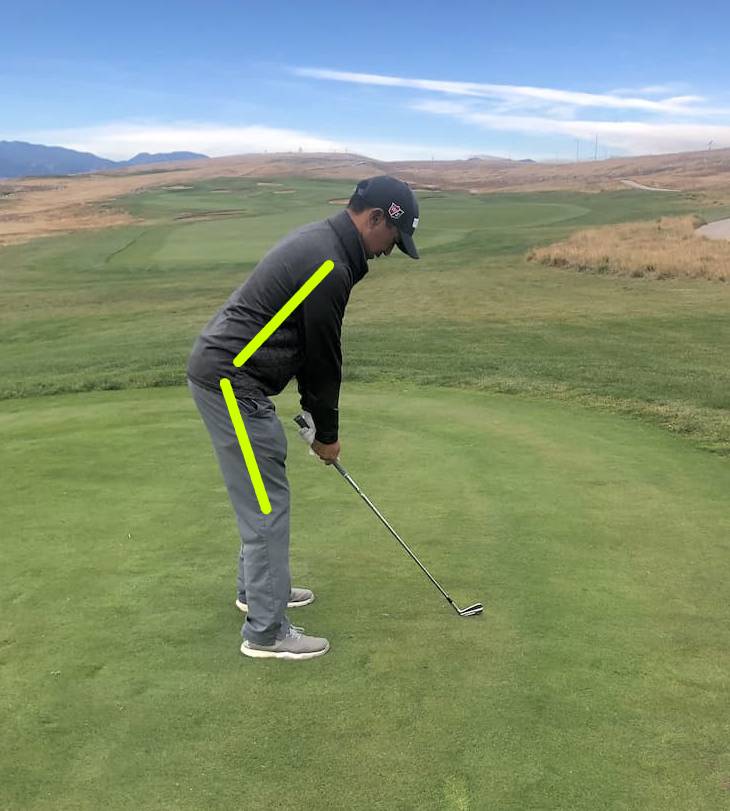
Trying to position your body posture in a certain way when you can’t see what it looks like is very difficult. Many of my students are surprised what they think they’re doing versus what they are actually doing. To prove this to my students I simply show them a picture of their posture for them to clearly understand.
I tell them to exaggerate sometimes and see where that takes them but one day I just came up with a posture reminder to help my students always remember what their posture should resemble. Because we all played PacMan as children, right?
- When you stand over ball, imagine you body may feel like a “<“ or PacMan’s mouth shape.
- Top of your body feels like your over the ball more and your legs/thighs
- Poke out tailbone so thighs feel further away from ball with legs still bent
- Shoulders now over your toes more so you can relax them to have arms just hang down “Elephant trunks”
- Where your arms hang is how close you should have your hands and arms to your body for a proper golf stance.
The PacMan posture should feel comfortable so another pair of eyes can help including the following examples. I’ve seen many students thinking they are in a better posture but sometimes exaggerating can look like something different when you actually see yourself. These are the two common postures that are not recommended.
- “C” Posture – Bending over the ball while creating your back arched like a “C”
- “S” Posture – Sitting down with the legs where your body is more vertical in a “S” shape
Note: Never reach out for the ball with irons. You should have your arms out further away from your body when setting up with driver, woods and hybrids. (Take note when watching golf on TV.)
Alignment
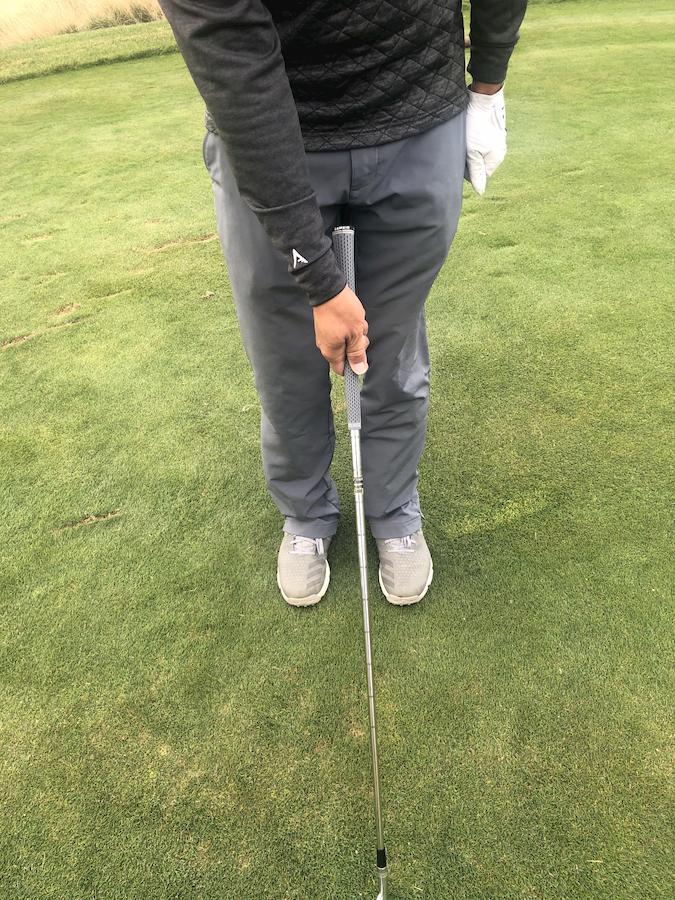
Ensuring your upper and lower body are aligned is so critical in hitting a more straight golf shot. Everyone has a tendency to aim a bit right or left of target sometimes to feel more comfortable or to promote something in your golf swing. Not everyone has to aim perfectly at the target. However the alignment of where your shoulders are aimed to and where your feet line are aimed will promote the ball flight you desire…or absolutely not desire.
Shoulders
- Shoulders should be aligned with your hips and feet line. You want to have your shoulders lined up just left (for a right hander) of your target since your club face should be aimed more at your target.
- Make sure your shoulder closest to your target is not tight and way higher than your trail shoulder for your irons. That shoulder is key as it can prevent you from turning your shoulders and coiling your upper body in your backswing. A high and tight left shoulder at set-up can also create a “roadblock” for your left side and prevent you from having the left side to lead your downswing towards your target and clearing your hips so you can properly release the club.
Hip / Feet Alignment
- Be sure your shoulders and lower body are lined up squarely in the same direction. – have someone check from behind/side of you to ensure everything is lined up correctly. If they are pointing in different directions, most likely you will put unintended spin on the ball unless you are lucky or very good with timing.
Golf Club Shaft Setup
- Take notice of your shaft set up. I see many students set up their golf shaft in a plane-angle usually aimed too far right (right hander), which will be overcompensated by squaring up the set-up to the shaft or closing the clubface. Make sure the shaft-angle is targeted more left of your target and not at it.
Club Face
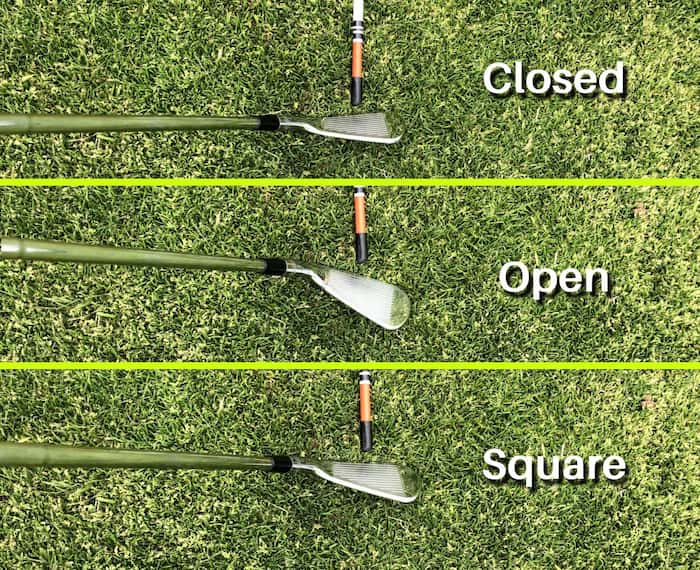
Setting up the club face properly in your golf stance can promote an easier and more consistent golf swing. Many of my students set up the club face to the ball at set-up closed without even realizing it. To prove this point, I take a tee and place the top of it to the face and lay it down on the ground. I then have them go behind the ball and target to see where the tee is pointed at. They can see now that they set up the clubface closed from their eyesight. It may seem trivial but to hit a great golf shot, it is vital to set up the face square or even slightly open at set-u,
- Backswing – Your club face will eventually turn with an open face and then open even more as you progress your backswing. But this means that you have released the club in the hands. You will feel the wrist hinge upward in a smooth manner. (You’re thinking…won’t the ball go right with an open face? I’ll touch on that next…).
- Downswing – Opening the face should have promoted more of a wrist hinge caused by releasing the club. If this was the case, it should have promoted the body to start your downswing. Because we setup on a side of the ball and now turn the towards the target with the body, the clubhead will close the open-face on the way down. The face should “almost” square up at contact. If you were to fully release the club and wanted to play a draw, you would want to have the club face a bit open at impact because past impact, the body turn then creates the club path further left of your target.
If you were to extend your throwing arm out to your side with a golf ball in hand, you will create an arc if you were to turn your body to throw it. The further the ball is from your body, more of an arc is created. So in golf, you have your arms and a club attached so there is a wide arc which means you have to release the club face at impact a bit open as the follow through is taking the club further closed. That is why you see many tour players shots shapes curve on television with the “Shot Tracker” It is very hard to hit a dead straight ball since we are on one side of the ball, not directly behind it.
Ball Position
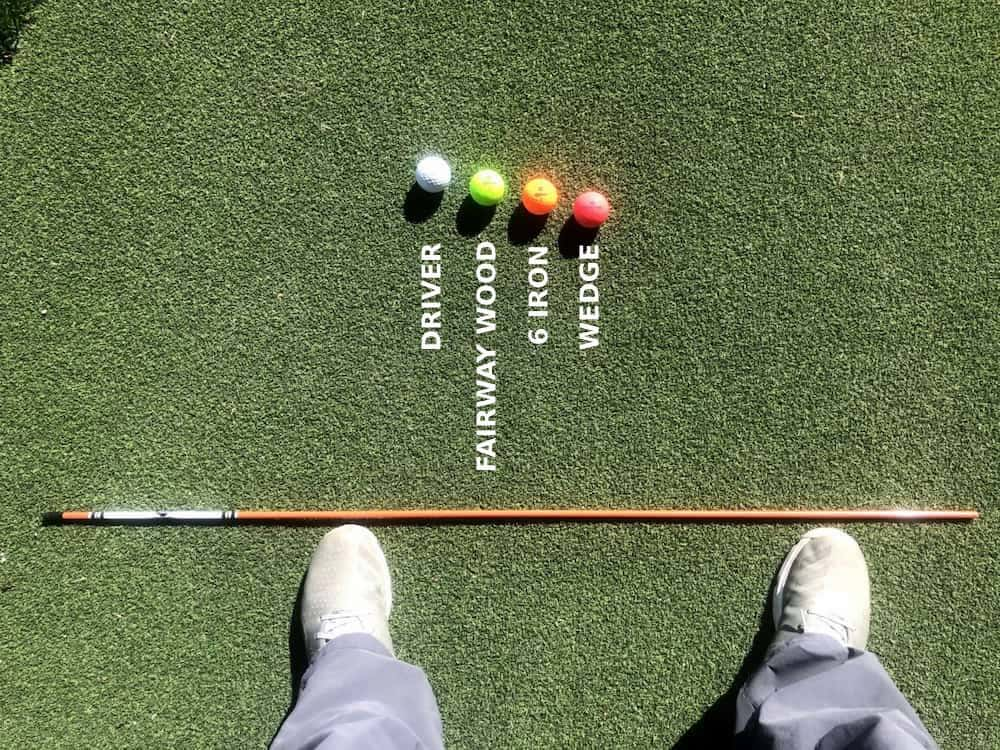
If you create a golf swing that releases the club naturally through impact, ball position is very important because it can determine if you make solid contact including your loft and face angle. It can also affect your swing speed when you make impact. An understanding of where the ball is placed to your setup is simple and easy to remember but let’s understand why it’s important first.
The earlier you make contact (RH placed ball closer to middle) on the way down usually means a steeper attack angle which is great for irons. The later you make contact (RH placed ball closer to left foot) usually means you will catch the ball on the way up instead of down. (V – explain why it helps to impact the ball on the way down for irons)
- Steeper impact for the clubhead with the irons because we want a negative loft at impact from when we started the loft at setup. This will create a better launch angle and more spin. The furthest back is middle of your stance.
- If the ball is too far back for a particular club, it will make impact without a full release with your arms and hands
- The longer the golf club, the more left you will place the ball so. Here is a general guideline for ball position placement based on club type.
- Driver – Ball teed up off of the inside of your left heel)
- Fairway/Hybrids – Ball 1/2 inch right of Driver position
- Longer Irons – (3-5/6) Ball 1/2 inch right of Fairway/hybrid position
- Mid/Short/Wedges – Centered on setup
To understand this more clearly, imagine you are holding a string with two fingers with ball attached to it. If the ball swings back and forth and you keep your fingers in the same position, the lowest spot of the arc you are creating is right below your fingers. Just to the side the arc ascends upwards which means that more loft is created is why your longer clubs have less loft because you will create the upward angle at impact all depending on where the club makes impact with the ball positioning.

